FREEBIE ~ Children’s Dressing Gown
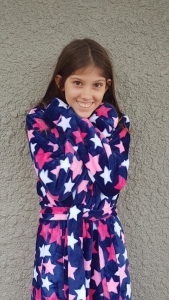
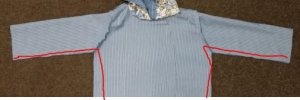
Snuggly Warm Dressing Gown
Today was day 2 of our 4 weeks of quarantine in New Zealand, and today I did some sewing with my oldest daughter Brylie (11yrs)
I’ve had cuddly fleece in my stash for a while now (ok, so maybe over a year) that I was going to make dressing gowns for last winter!!
Well we are in to Autumn now, and stuck at home so I thought “there is no time like the present”.
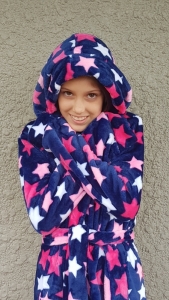
It’s a simple design with an oversized hood, and snuggly long sleeves and I thought, hey, every one else is stuck at home too, maybe they want to make one also.
So here is the pattern free for you ~ please note that this pattern has not been fully tested like all my other patterns, but it is based off a well used and loved block so I know the fit is good.
What you will need:
The pattern pieces ~ purchase for free on my website
Fleece, minky, sherpa or some other thick snuggly fabric.
fabric requirements: 150cm (59″) wide
6-12mm = 60cm ( 23 5/8″)
12m = 70cm (27 1/2″)
18m = 70cm (27 1/2″)
2y = 80cm (31 1/2″)
3y = 80cm (31 1/2″)
4y = 1.3m (51 1/4″)
5y = 1.3m (51 1/4″)
6y = 1.4m (55 1/4″)
7y = 1.4m (55 1/4″)
8y = 1.6m (63″)
9y = 1.6m (63″)
10y = 1.7m (67″)
11y = 1.7m (67″)
12y -= 1.8m (71″)
Matching thread
Sewing machine and/or overlocker (We just used the overlocker)
How to sew it:
Because I want to get this pattern out to you as quickly as possible I’m only going to steal photos from some of my other patterns, so the fabric will be different, but the construction is the same.
RST = Right sides together / WST = Wrong sides together
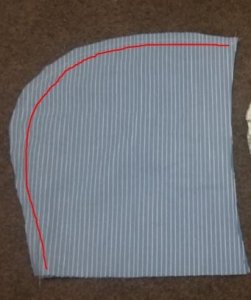
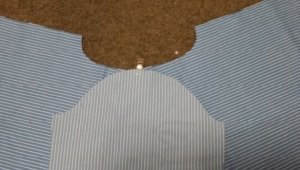
SEW THE HOOD
~ With RST sew around the curve of the hood.
SEW THE SHOULDER SEAMS
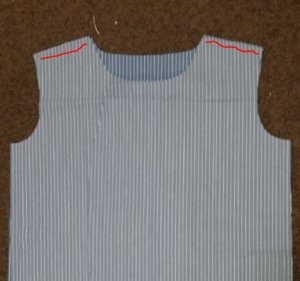
~ With RST match up the shoulder seams of the back and 2 fronts. Make sure you have the armholes of the front pieces matching the back armholes. Sew along the SHOULD SEAMS ONLY.
ATTACHING THE HOOD
Fold the back neck in half to find the centre point – mark with a pin/clip.
With RST match the seam in the base of the hood with the clip at the centre back of the neck, pin the base of the hood along the neckhole, the hood will match the entire neck hole. SEW.
INSERT SLEEVE
Find the centre of the centre of the sleece arc, and mark with a pin/clip. With RST match to the shoulder seam.
Ease the rest of the sleeve into the armhole. First pin the ends, then ease in the rest of the curve. SEW
SIDE SEAMS
With RST match up the under arm seams, and pin from the wrist to the hem. SEW
SLEEVE CUFFS
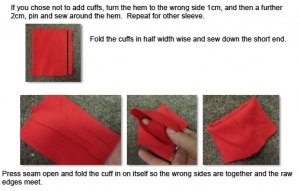
Fold the sleeve cuffs in half width wise with RST and sew down the short edge.
Insert the cuff into the sleeve which is still wrong side out so that the cuff is against the right side. Match up all the raw edges and SEW. Go slowly as this can be quite thick depending on the fabric you are using.
POCKETS
To sew the pockets place MAIN and LINING right sides together and sew down the sides and bottom V. Turn it out the right way and then fold the raw edge of the lining so that it meets the top of the main, then fold it again so that it covers the raw edges. Topstitch along the top.
Now pin the pockets to the FRONT body piece. Topstitch in place around the sides and bottom V.
FRONT BAND
For the front band I just cut 2 pieces the width of the fabric (how thick you need to make the band is on the back pattern piece) and joined them in the middle. Then I folded in half with WST and found the centre of the band and marked it with a pin/clip. Attach this pin/clip to the seam at the top of the hood, on the right side. Start sewing from the top of the hood and sew down one side to the bottom hem. STOP and then start from the top again and sew from the hood down the other side to the bottom hem. Trim off any extra you have. (I actually used the extra I had from Brylie’s size 11y to create the tie.
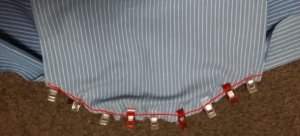
HEM
Fold the bottom hem up toward the wrong side and sew, I did a double turn, it was about 2cm then 2cm as it was a real thick fabric, do what feels right for you. You could overlock the bottom and then turn up as another option.
TIE
For the tie I just used the 2 pieces of left over front band. Fold in half with RST and sew down 1 short end, and the long end. Turn out the right way. Repeat for the other piece. Now place the raw edges together and sew down the short edge. Attach this join at the back of the dressing gown.


Wonderful- thank you for sharing this free pattern. Can’t wait to be able to go and buy some fabric for my 2-y-o granddaughter and her 4-y-o step-sister. 😍 When this craziness is over!
I know, is’nt it crazy. life certainly has thrown a curve ball as us all.
Thank you for this! Perfect to upcycle some towels during the lockdown!
Thanks for sharing!
I plan to make one for my 5 year old 🙂
Quick Q: Approx how much fabric would I need??
if your fabric is 150cm wide you’ll need approx 130cm length
Hi would be great as part of the blog to include fabric requirments for the dressing gown
thank you, yes I agree, I will get on to that.
Thanks for sharing the dressing gown pattern. Have cut out apart from the front band. Can’t work out what width it should be. Have looked at back pattern piece as mentioned in instructions but can’t see anything. Appreciate your help as keen to sew up. Many thanks
The back pattern piece has some writing on it titled BAND – under that it says the band width
I’m late to the party on this but sewing my first one up now! I also struggled to find the BAND info – for anyone looking, I found it embedded in the 6-12m layer, which was off when I printed my size 7. Thanks for the great pattern!
Oh, I’m so sorry that the Band info was mistakenly put on the wrong layer. I’m glad you found it.
Hi, thanks for the pattern, just wondering how to do the pockets, there’s nothing in the above instructions about them. Thanks for your help.
Here there, I have added that into the tutorial now. sorry.
Thanks very much.
I love your model and the material. She inspired me to make a dressing gown. However I did struggle with the band so I ended up using two hoods as a lining for the hood. I think I am supposed to attach both ties to the back centre Also I am struggling to understand the pockets, is it possible to add a picture? Thanks
join the two pieces of tie together and attach the join at the back of the gown. unless you did a long piece with no join, then attach the middle of the tie at the back.
I haven’t got photos of the pockets at the moment. what you can do is just cut them both the same size and stitch right sides together and turn out the right way. then close up the gap and attach as patch pockets. Hope this helps.
Just to let you know that the page numbering on the pattern seems to be out. There are 21 pages in the pattern, but the numbering goes from 18 straight to 20, skipping page 19. Thanks for the freebie!
thank you, I’ll sort that out.
Also, I can’t seem to find it mentioned anywhere. The seam allowance? I’m assuming either 1/4″ or 3/8″.
3/8″ or 1cm
Hi, thanks for the pattern. Are you able to add the layout for the pattern pieces please.
Thanks
Figured it out 😊
This is confusing me – how did you do it?
Hi Jackie
What exactly are you confused about?
Thanks so much for this terrific pattern. Just what I was looking for to make for my Granddaughters!
Thank you very much for this pattern. My daughter and I love it!
You’re welcome, I’m glad your daughter likes her dressing gown
Hi. Thank you for the pattern. Does it print out automatically in landscape as when I printed the first page this is how it came out. Or do I have to change it to portrait. Thank you
Hi. Thank you for the dressing gown pattern. Does it print out automatically in landscape as when I printed the first page this is how it came out. Or do I have to change it to portrait. Thank you
it should automatically print on landscape, put it on auto and it will choose the correct way
How do I work out where to place the pockets please?
I just eye ball it, if you have the child, you could put the gown on them and get them to work out where would be best. because this was a free pattern I didn’t spend time on placement of the pockets.
I’ve printed all pages of this pattern but cannot find the order for each piece of the pattern to join all the different pages together. Is this available?
Hi Catherine, I hope you worked this out by laying them all out. generally the order they print in you lay them out in rows and they match up.